Bayou Jumper Transceiver, Soup’er Up’er, and Tuner
Dave-W3JDH
1-31-2018
Available from:
Four State QRP Group
This was my first serious building project and the experience was a pleasure and very rewarding.
The first of the three units I built was the Tuner, and it was assembled using the provided surface mounting board. There are no holes in this style of PCB, so care was required in properly forming the leads and mounting the components.
The Bayou Jumper (B/J) and the Soup’er Up’er (S/U) use through the hole style mounting on the PCB.
This excellent random wire antenna tuner is the classic T-Match design which is known for wide matching range and smooth operation. The SWR indicater employs TWO leds, not the normally seen single red LED. A green one indicates output power with a red one indicating reflected power. The beauty of this arrangement is that the operator sees the output power peaking as the SWR goes down, just like a power meter with dual meters – very intuitive.
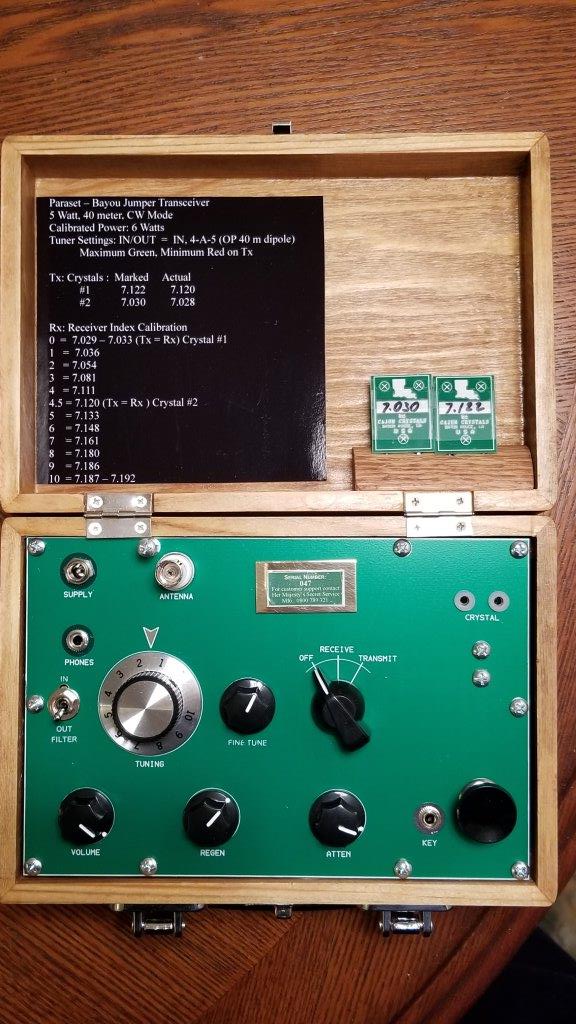
The Bayou Jumper is a modernized version of the famous Paraset spy radio. It retains that great retro look but with modernized circuitry. The name “Bayou Jumper” is a play on “Ocean Hopper”, a famous regenerative receiver of a bygone era. With it’s distinctive panel and wood box enclosure, it pays homage to the famous spy radios of WWII. The receiver covers all of the CW segment of 40 meters, and the transmitter is Crystal controlled. Two crystals are included in the kit, 7.030 mhz and 7.122 mhz.
The Soup’er Up’er is an add-on accessory board for the Bayou Jumper that adds a sidetone for transmitting, receiver fine tuning, and the Hi-Per-Mite CW Filter – all on one board to enhance the useability of the Bayou Jumper. The Soup’er Up’er mounts on the bottom of the Bayou Jumper’s circuit board and does not require cutting any traces. *
The instructions, parts and documentation are excellent and I found that by reading the website provided manual thoroughly, most questions about the whys and wherefores were competently covered. The sequence of parts assembly is well thought out and building hints are found throughout the instructions.
Each of the kits’ manuals includes a parts list, tools needed and many photographs along the way during assemble. The wooden enclosure box I selected was as suggested in the instruction manual, available from Hobby Lobby
I am listing suggestions that made for an easier build and a better results.
- Read the instructions and review the photographs and parts list before beginning the build.
- With my older eyes, I found that a Led Lighted Head Visor Magnifier was critical in both identifying the parts printed designation, and assembling and soldering the components. (Photo included)
- Begin by making sure that all components and parts have been included, with correct makings on the capacitors, resistors, diodes, potentiometers, transistors, and switches. I used small kitchen bowls to place like identified components together. (Photo included)
- Use a variable power soldering iron with multiple tips; provides the flexibility needed for soldering large tabs or very tiny components in tight locations.
- A great suggestion from the kit suppliers. “Build on a cooking tray, with sides.” This will prevent dropped parts from bouncing all around the floor and getting lost or stepped on in your work area.
- Support the PCB during assembly with bolted legs screwed into the hex nut surface connections. This will allow for a steady base so you can solder components without the possibility of putting pressure or bending on any of them during the building process. (Photo included)
- When possible, use a heat sink to protect the integrity of components during soldering. I used a small hemostat clipped to the lead between the component and the solder connection. (Photo included)
- Build a jig to provide a third set of hands for the soldering of the crystal and the wire plugs to the back-plate. (Photo included)
- I used a pen, and a nail held in a vise, as methods to help with holding, winding, and tightening the toroid wire. The pressure on each wire from inside the toroid will make for a better end product. And you never seem to have enough fingers and hands to get a good grip. (Photos included)
- Power is supplied by a 12 volt external power supply, through a plug located on the top panel.
- In addition to using earphones through the supplied phone jack, I also purchased an MFJ281 mini speaker from HRO, which comes with the required 1/8 inch plug.This allows others present in the Ham Shack to listen and enjoy the beautiful sound of an operational Spy Radio, built and operated by this Special Agent (more on that later).
The Four State QRP kit designers and shipping volunteers were always quick in responding to any questions I submitted by email. Missing, lost, or damaged parts are resupplied without question or cost.
I am using a home brew 40 Meter dipole, a part of my tri-band 20-40-80 and 60 meter antenna system.
In using the radio, the frequency selection from the toroid, is non-linear. Thus, when tuning in a station, the upper and lower portion of the 40 meter band is wide on the control. But in the center portions, just a very slight touch of the dial will take the contact off frequency. AND IT DRIFTS. The Soup’er Up’er fine tuning capabilities, along with the Filter and Sidetone does a good job of enhancing the overall utilization of the radio, and eliminates some of the frustration in hearing a station and dealing with frequency drift.
I was able to make a contact of 470 miles on December 4, 2017 with a radio friend from Georgetown, Maine.
In keeping with the original purpose of the Paraset Spy Radio used during WWII in Europe, that QSO qualified me and my radio to be an “Agent of the Secret and Protective Order of Clandestine Wireless Operators”. And I have the Certificate to prove it. (Photo included)
Several photos are included showing the Tuner, Bayou Jumper, and Soup’er Up’er, during phases of assembly and as completed units.
* Information supplied from 4sqrp.com website description
Dave Holloway
W3JDH

You must be logged in to post a comment.